Prizm Content Connect
How to Work with Annotations
| User Guides > PCC with Legacy Services (Proxy Server) > How To's for PCC with Legacy Services (Proxy Server) > How To's - for the HTML5 Viewer > How to Work with Annotations |
This section describes how to load and save annotations in the HTML5 viewer, including the web tier code specific to annotations. For information about what controls are available for annotations and redactions, refer to the section: Annotate and Redact Tab in the HTML5 Viewer topic.
The annotation ID may be specified through the UI and through the PCC plugin. To initialize the plugin with a specific ID, the parameter “annotationID” must be specified with value.
| Example |
Copy Code
|
|---|---|
var pluginOptions1 = { documentID: documentName1, annotationID: 'AnnotationID' } |
|
|
|
The value specified within the plugin will be the default annotation ID used within the UI of the HTML5 viewer. Even though an annotation ID may have been specified through the plugin, the user may change the name of the annotation ID by selecting the “Annotate & Redact” tab from the toolbox menu and then manually type the name of the annotation ID into the input field. |
|
|
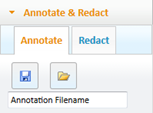
To save an annotation from the PCC viewer’s user interface, select the Annotate & Redact tab, specify an annotation ID in the input field and click the Save icon. |
|
|
To load an annotation from the PCC viewer’s user interface, select the Annotate & Redact tab, specify an annotation ID in the input field and click the Load icon. |
Annotations are saved with a unique name that is specified by the document, session and annotation ID. When an annotation file is saved, it is stored in the path specified in the configuration file “prizmconfig.xml”, located in the root directory of the HTML5 sample code. The annotation markups folder that stores the annotation files may be changed within prizmconfig.xml.
| Example |
Copy Code
|
|---|---|
<MarkupsPath>%ALLUSERSPROFILE%\Accusoft\Prizm\Markups</MarkupsPath> |
|
 |
The folder that contains the annotation files will need read and write access in order to properly work with Prizm Content Connect. |
The annotation data is saved in an XML format that specifies the annotation data for each page within the document. For each page within the document that contains an annotation, an “annotation” node will be generated, which is the child of its parent, the “page” node. The “annotation” node will contain the necessary data to redraw the annotation once the file has been loaded.
| Example |
Copy Code
|
|---|---|
<?xml version "1.0"?> <documentAnnotations> <pages> <page id="1" pageWidth="1275" pageHeight="1650"> <annotation nodeId="DA6D74E7-064C-B92C-1A7F-429BFA0A7E37" lineColor="0" stampSize="122" fillColor="16450564" drawType="circle_filled" dragDirection="br" x="533.3737864077669" y="304.36893203883494" x_percent="0.4183323814962878" y_percent="0.18446601941747573" height_percent="0.2524271844660193" width_percent="0.2575671045117076" height="416.5048543689319" width="328.3980582524272" lineWidth="1" meta="" label="" saveDate="Tue Nov 27 2012" saveTime="16:3:36 GMT-0500" uuid="" formUser="" created="Tue Nov 27 16:3:36 GMT-0500 2012" modified="Tue Nov 27 16:3:36 GMT-0500 2012"><![CDATA[]]></annotation> </page> <page id="2" pageWidth="1275" pageHeight="1650"></page> <page id="3" pageWidth="1275" pageHeight="1650"></page> </pages> </documentAnnotations> |
|
While annotations are loaded from an XML file, redactions are burned directly to the image that is generated by the server for each document. When an area of a page is redacted and saved to the server, it may no longer be edited, as it has become part of the image displayed within the HTML5 viewer. This functionality differs from annotations, as annotations may be added or removed to a document.
|
Burning in redactions is a server-side process, although code can be written into the web tier to burn redactions in real time. These topics are covered in the How To Section for the Imaging Service. |